Pin It

Wednesday, 11 December 2013

Snowman Fun


Aren't these guys cute?  We made these snowmen ornaments as a Buddy project!  

Last year I was wandering around our local craft store trying like mad to come up with an idea I realized that if I combined two different ideas together I had a quick and easy solution to my buddy project. One of the ornament ideas I saw on Pinterest had tinsel in the ball and another used ornamental snow in the ball to make a snowman face.  I pinned both ideas on my Pinterest site.  Brainwave!  Use white tinsel in the ball instead of the snow and draw the face on with sharpies!  Bought some tinsel that had snowflakes mixed in to the tinsel and experimented at home!  A three inch piece of tinsel pushed into the ornament with a pencil and a sharpie face drawn on and we are done.  Add the name and the date on the back and we have a keepsake for both the big buddy and the little buddy!  It was a huge hit last year so of course it was on the list to do this year. 

I love how they all have such personality!  


We are also making some snowmen for Christmas presents for the parents.  Each year my husband cuts up enough blocks to make these cute snowmen with my class!


I posted about how to make them last year here.  We are just finished painting our blocks and we should be putting them together later this week or early next week!  The children had a good time sanding their blocks and are eager to put them together!  


We have been having fun using Doodle Buddy on the iPads to create Christmas trees.  We are saving our pictures to the camera roll and when everyone has made a picture we are going to import them into a story making app.  


They just love drawing on the iPad and are eagerly waiting for their turn!  I love Christmas! 

We also made a Christmas tree count up book today.


The children did a great job! We added a new cover this year.  Very simple but a huge hit!  I bought some glittery stars at our local craft store and we put them on the top!  


You can find this activity in my Christmas Fun package at Teachers Pay Teachers! 


Hope you are enjoying the season!  

Saturday, 30 November 2013

Fun with Christmas!


This week we are starting to work on our Christmas senses project!  I love Christmas and can't wait to start working on Christmas vocabulary projects.  This project evokes the five senses of Christmas.  Each day we do a brainstorm about the things that evoke one of the five senses and record it on it's own sheet.  


These are just a few of the fabulous pages that my students created for me last year!  I can't wait to see what this year's group comes up with!  

We made Christmas lights house for the covers.  


I pre-cut the house shapes and the tree.  I pre-cut the window slits and let them cut open the fold. and fold the windows open.  We glued little pieces of white paper to the back of the house shape.  Then the children drew pictures about their house in each of the window.  I asked them to make sure to fill the window space.  We had them put their family in one window, a tree in the other window, and their choice for the final window. 

The children then came a few at a time to add little drops of glue from a white glue bottle to make the "Christmas lights".   They also decorated the tree in front of the house.  Then I sprinkled glitter all over it, shook off the glue and had a great time watching their faces when they see the final result!  Very, very popular activity with my students.  


I put the projects on a background of snow and then they really pop!  


You can find all the parts to this project and more in my Christmas Fun package in my Teachers Pay Teachers Store! 


I have posted about some of the other projects in this package on this blog here and here!   Please take a look!  We had fun! 

This was a very popular project last year and made a wonderful keepsake!  It is really cool to find out what the children's ideas are for the sights and sounds of Christmas!  Very heartwarming!  


I have used this project to help decorate my door for our annual Christmas Door Decorating project!  

I love Christmas!  
P. S. I am having a sale on Cyber Monday!  Check it out!  


Sunday, 10 November 2013

AR Dinosaur Fun!


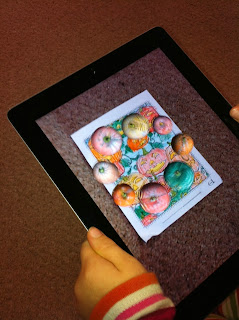
We are having a lot of fun with Augmented Reality this week!  We worked with the Augmented Reality cards for dinosaurs that I downloaded with the AR Flashcard app on our iPads.  It is really cool!

You print off the cards with a color printer.  These particular cards came with the AR flashcards for the alphabet that we blogged about on my classroom web site a few weeks ago!  Once you have the cards all you have to do is activate the app and then hold the iPad over the picture.  Magic happens!  A 3 D image of the dinosaur appears!

If you tap the screen, a child’s voice says the name of the dinosaur.  I thought you had to hold it over only one card at at time but the children discovered that they could get all the dinosaurs at once by putting the cards closer together! 


 Even our principal gave it a try!  

We have already played with the AR Flashcard app for the Alphabet.  

The app is called AR Flash Cards.  AR is short for Augmented Reality.  It is a fantastic app!  I printed off the Alphabet cards on my color printer at home.  Then I cut them apart.  I had already downloaded the app.  You basically open the app, place the ipad over the card and wait a little bit.  Magic happens!!


A three dimensional animation of the animal on the alphabet card appears on the screen.  When you touch the screen the audio component can be heard.  It tells the child the name of the letter and the animal!
I was able to let all the children see the magic at the same time using the projector and the special adapter cord I have for the iPad.  Later, the children used the iPads independently to try it out by themselves.
I wish I could have taped the looks on their faces when the first animation appeared!
The alphabet cards are really neat and I know we will get a lot of use out of them!  They were free!  Very easy way to get students interested in alphabet skills!  We will be having lots of fun with alphabetizing, letter sounds, spelling practice, and so on with this app!

There are more cards coming soon but they have a cost attached.  I think they will be worth it! 

We also worked with another augmented reality app I have discovered.  It is called CoLAR Mix.
I was a bit sneaky!  I had the children color a special coloring page that I had downloaded for them.  I told them if they did a really good job we would do something really cool with it!

After they finished coloring, I loaded this app and just held the iPad over their coloring.  The look of their faces was priceless!  


We started a new theme this week!  Can you guess?
We started off with a mini research report about dinosaurs.  Specifically apatosaurus!  I prepared a small list of facts about apatosaurus that we read together and sorted into different categories!  They were What They Look Like, What they Eat, About the Babies, and Cool Facts.  We read the facts together and as we read them we applied a code to the facts.  L for What They Look Like, E for What They Eat, B for About the Babies, and C for Cool Facts.  The children thought they should all be cool facts!


Then they cut out the facts and glued them to the appropriate page.


Then I staple them into the covers I had premade for them.  They attached the head and drew a face and had a funky dinosaur report to display!  


Lots of dinosaur fun!


Thursday, 7 November 2013

Left over Halloween Fun?


It's November already!  Where did the time go!  Just wanted to post about some the fun we had this year in October!  I guess I was having too much fun to have time to post about it all!  I guess this post is a bit like leftover Halloween candy.... Hate to see the end of it!  
We learned about bats and discovered some new cool names for bats which we used to make a simple bat poem.  


The children seemed to really enjoy making the bats and did a really good job!


We had fun making these ghost eye trees with our Big Buddy class.  I found the tree idea on the Family Fun craft website.  I added the spider web stuff to make it look misty and some Halloween wire garlands and some foam ghost stickers to make it spooky!  


Our Big Buddy class also helped us make these covers for our Five Little Pumpkin books!  We also made Five Little Pumpkins on a Gate for a snack.  A take off on Ants on a Log!  We used celery sticks for the gate, five carrot rounds for the pumpkins, and Cheez Whiz for the "glue".  We have peanut allergies at our school so the Cheez Whiz is an alternate choice!  


They read their books with their buddies when they were done making the covers!


We also make five little pumpkin puppets on Halloween with the help of our parents. I hot glued the orange pompoms to the gloves beforehand.  The children just had to glue the fence posts to each finger, leaves on the top of the pompoms, and draw a face on the pompoms using a Sharpie.  


We also made the Mummy Dracula cans again this year!  Always a big hit with my students!  

Check out last year's post about how to make these guys!  Lots of fun! 

We have a door decorating contest each year for Halloween!  The children made count up haunted houses which we used for our entry!  Take a look!

They had a really good time decorating their haunted houses to match their count up story.  


We also made this fun quilt using squares and triangles.  You can find the printables for the haunted house and the bat poem in my Halloween Fun package at Teachers Pay Teachers.  It's free! 


Can't remember where I found this idea but would love to thank that person over and over again!  My guys love making this quilt!  

Hope everyone had as much fun on Halloween as we did!